Remote Desktop Connection (RDC) is a technology that allows you to sit at a computer/notebook and connect to a remote computer/server in a different location through the network. RDC is installed by default on all versions of Windows XP/Vista/7/8 Operating Systems (OS), but not at Windows 95/98/2000 OS.
Assumptions:
- Your own local computer/notebook is running Windows XP Professional SP3 OS. If you are connecting to a remote computer that is running Windows Vista or Windows Server 2008 OS, please download and installed the RDC Terminal Services Client 6.1 in order to make use of the new Remote Desktop Services features in it. This will update your Remote Desktop Protocol to version 6.1.
If you are connecting to a remote computer that is running Windows 7 or Windows Server 2008 R2 OS, please download and installed the Remote Desktop Connection 7.0 client update [for pc running Windows XP Service Pack 3 (SP3), Windows Vista Service Pack 1 (SP1), and Windows Vista Service Pack 2 (SP2)] in order to make use of the new Remote Desktop Services features in it. This will update your Remote Desktop Protocol to version 7.0. - If your own local computer/notebook is running Windows 7 Service Pack 1 (SP1) or Windows Server 2008 R2 Service Pack 1 (SP1) OS, please download and installed the Remote Desktop Protocol (RDP) 8.0 update in order to make use of the new Remote Desktop Services features. These features were introduced in Windows 8 and Windows Server 2012 R2 OS. This will update your Remote Desktop Protocol to version 8.0.
- You have login to the National University of Singapore (NUS) network using wired connection. If you are using wireless connection (NUS), please login to the WebVPN first before trying to make a RDC to the remote computer/server in NUS.
- Assume the remote computer/server is already powered on and no one has login to it.
Microsoft Remote Desktop Connection Client for Mac
Microsoft Remote Desktop Connection Client for Mac allows Macintosh computer users to connect to a remote Windows-based computer/server and work with programs and files on that remote Windows-based computer/server from their Macintosh computer.
- If your MAC OS X is v10.5.8 or later, please download and install “Microsoft Remote Desktop Connection Client for Mac 2.1.1” (for remote Windows-based computer/server running Windows XP/Vista/7/Server 2003 or 2008) or
- If your MAC OS X is v10.4.9 (Tiger) or later, please download and install “Microsoft Remote Desktop Connection Client for Mac 2.0.1” (for remote Windows-based computer/server running Windows XP/Vista/Server 2003 or 2008) or
- If your MAC OS X is v10.2.8 or later, please download and install "Remote Desktop Connection Client 1.0.3 for Mac" (for remote Windows-based computer/server running Windows NT Server 4.0/XP/Server 2000 or 2003). The Macintosh computer must be using Macintosh PowerPC Processor and the hard disk should be in Mac OS Extended (HFS+) format which is the default format for Mac. Microsoft does not currently support running Remote Desktop Connection from a hard disk that is in another format.
Please note that "Remote Desktop Connection Client 1.0.3 for Mac" will not work if the remote Windows-based computer/server is running Windows Server 2008 OS.
For MAC user to connect to the remote Windows-based computer/server from their Macintosh computer/notebook, please input Fully Qualified Domain Name (FQDN) or IP address of the remote Windows-based computer/server. For example, if the given remote Windows-based computer/server has a local hostname of remoteServerName and a parent domain name of stf.nus.edu.sg, the FQDN is "remoteServerName.stf.nus.edu.sg".
Remote Desktop Manager (by Devolutions Inc.)
Remote Desktop Manager (by Devolutions Inc.) v8.0.12.0 or higher version centralizes all your remote connections [Microsoft Remote Desktop (RDP), Microsoft Remote Assistance, VNC, Citrix (ICA/HDX), TeamViewer, Radmin, pc Anywhere, FTP/FTPs/SFTP, SSH, X Window, etc], passwords and credentials into a unique platform.
To make management simpler, Remote Desktop Manager lets you organize sessions in groups (folders). Then, you can open several sessions at the same time by selecting a group.
- Compatible with Windows XP, 2003, Vista, 2008, 7, 8 and 2012
- Require Microsoft .NET Framework 3.5 or higher version
- Comparing Standard Edition (free) and Enterprise Edition
Create a Remote Desktop Connection
1. Assume you have already login to NUS network in your computer/notebook. For Windows XP/7 OS, kindly click Start → All Programs → Accessories → Remote Desktop Connection to open the RDC.
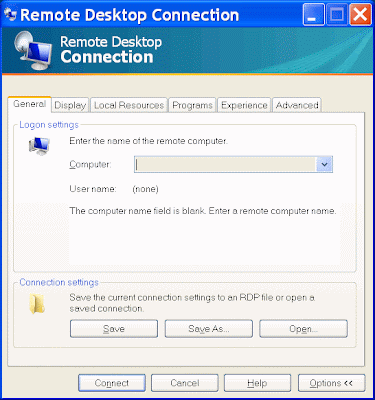
2. At the RDC window, under the General tab, in Computer:, kindly types the remote computer name or its IP address.
3. Kindly click the Experience tab, in Performance, kindly select "LAN (10 Mbps or higher)".
Most of the Experience settings are related to the graphical nature of the desktop. Because the processing for graphics happens on the remote computer and must be transmitted to the desktop over the network connection, you can increase performance by allowing only the minimal settings that are necessary for your users. For optimal performance, the below configurations are recommended:
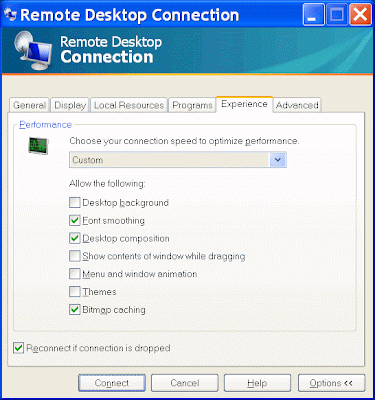
Desktop Experience Settings
| Setting | Description |
| Desktop Background | Allows user to choose a custom background or wallpaper for their desktop. Because these can be very graphic-intensive, disable this setting unless it is necessary for your users. |
| Show contents of window while dragging | Redraws the contents of a window rather than showing just the frame of the window when you move the window across the screen. Because this redrawing takes place on the server and needs to be transmitted over the network connection to display on the user's desktop, disable this setting unless it is necessary. |
| Menu and window animation | Enables cascading menus and scroll transitions for menus and tool tips. Because this rendering takes place on the server and needs to be transmitted over the network connection to display on the user's desktop, disable this setting unless it is necessary. |
| Themes | Allows user to choose a background plus a set of sounds, icons, and other elements for their desktop. Because many themes are graphic-intensive, disable this setting unless it is necessary for your users. |
| Bitmap caching | Stores frequently used images on the local computer to speed up the connection. By enabling this setting, these images do not have to be transmitted across the network connection each time they appear on the desktop. This setting is enabled by default. |
4. Click Connect. The Credentials dialog box will appear:
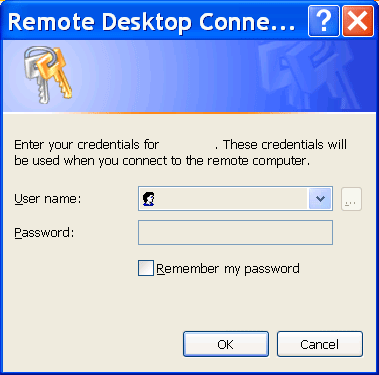
In the Credentials dialog box, kindly type your UserID (nusstu\yourUserID for student or nusstf\yourUserID for staff) and Password, and then click OK to connect to the remote computer.
Copy and paste a file from a local computer to a remote computer
Method 1
1. Assume you have already login to NUS network in your computer/notebook. Kindly click Start → All Programs → Accessories → Remote Desktop Connection to open the RDC.
2. At the RDC window, kindly click the Local Resources tab, and then under Local devices and resources, click the More... button.
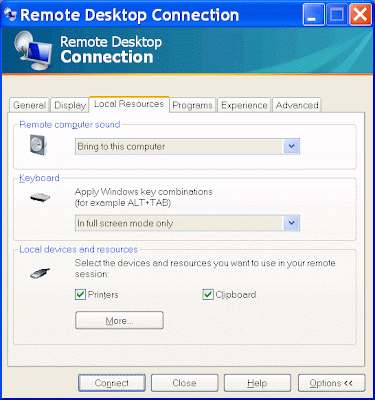
3. Click the plus sign (+) next to Drives, select the drives (eg: D:) on the local computer/notebook (the computer/notebook at which you are currently sitting) that you want to use in your Remote Desktop session, and then click OK.
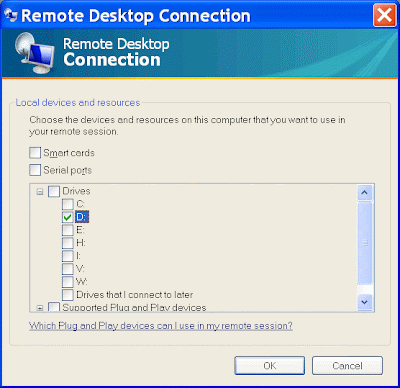
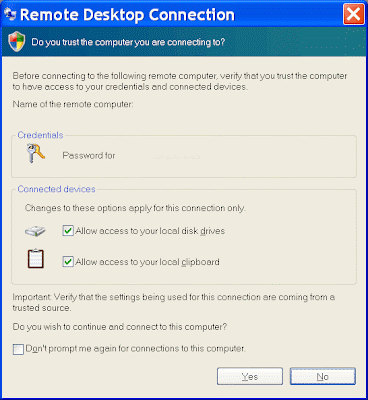
4. At the RDC window, under the General tab, in Computer:, kindly types the remote computer name. Click Connect to establish a connection to the remote computer.
Kindly click Yes when prompt whether you trust the remote computer that you are connecting to.
5. At the remote computer, kindly open a Windows Explorer by clicking Start → All Programs → Accessories → Windows Explorer
In the Windows Explorer, you'll see the drives on the remote computer as well as the drives on your local computer. The following example shows how the drives on your local computer are named when they appear in the Windows Explorer on the remote computer:
D on yourComputerName
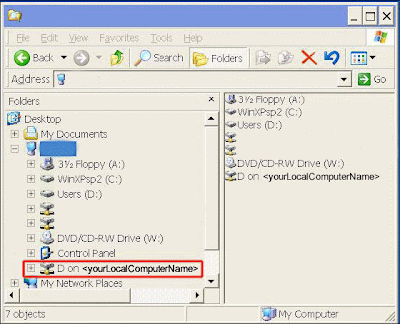
6. In the remote computer Windows Explorer, navigate to the file that you want to copy under the “D on yourComputerName
7. In the same remote computer Window Explorer, kindly navigate to the location on the remote computer where you want to paste the file, eg: Users (D:) drive. Right-click the drive/folder icon, and then click Paste to transfer the file from your local computer to the remote computer.
Method 2
If you are unable to use RDC to establish a connection to the remote computer, you can use this method provided that you have already configured a share folder at the remote computer.
1. Assume you have already login to NUS network and your d:\users\yourName
2. At the local computer, kindly open a Windows Explorer by clicking
Start → All Programs → Accessories → Windows Explorer
Kindly navigate in the Windows Explorer window to the file residing on your local computer that you want to transfer to the remote computer. Select the file, right-click and click Copy.
3. In the Windows Explorer Address, kindly type the remote computer name, eg: \\remotePcName
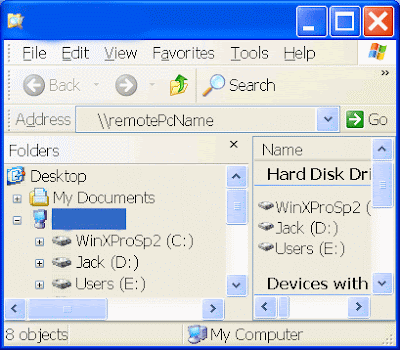
After a while, Windows Explorer will list those shared folders at the remote computer.
4. Kindly locate your remote share folder at the remote computer. Right-click on your remote share folder icon and click Paste to transfer your file from your local computer to the remote computer.
To disconnect (lock) without ending a session
1. In the RDC window, click Start → Disconnect (or Lock if the remote computer is running Windows Server 2008 OS), and then click the Disconnect button to disconnect your RDC session. You can also disconnect from a session by closing the RDC window.
Disconnect or lock your RDC session will still allow your running simulations to continue running so that you can check your simulation stage later.
Notes:
RDC automatically reconnects to this session the next time you connect to this remote computer (if the remote computer is configured to allow reconnection of disconnected sessions). By disconnecting without ending a session, the remote computer screen will still be locked by the remote user who previously login to use the RDC, and other users will not be able to login to use the remote computer.
To log off and end the session
1. In the RDC window, click Start → Log Off, and then click the Log Off button to end your RDC session. By logging off and end the session, any running simulations or applications processes will end. The remote computer screen will not be locked. The remote computer will return back to the login screen so that others can login to it again.
Remote Desktop Connection (RDC) error message(s)
- Please refer to the Microsoft website i
f you encounter the error message "Remote desktop connection "The local policy of this system does not permit you to logon interactively". If the remote computer had already applied the above suggested resolutions but still encountered the same error message, please delete all the users in the Remote Desktop users list and click OK to System properties → Remote tab window (detail steps shown in the next error message, "Remote Desktop can't connect to the remote computer for one of these reasons:" below). Then, add the users to the Remote Desktop users list again. - Assume you have already logged in to the WebVPN using your Windows 7 OS notebook at your home and is trying to use RDC to remote access your Windows XP Professional SP3 OS computer in a laboratory in NUS, but encountered the below error messages when using RDC to connect to your NUS laboratory computer using that computer name:
Remote Desktop can't connect to the remote computer for one of these reasons:
1) Remote access to the server is not enabled
2) The remote computer is turned off
3) The remote computer is not available on the network
Make sure the remote computer is turned on and connected to the network, and that remote access is enabled.
Assume that the NUS lab computer is already power on and no one has login to it, please try the below solutions:- In that NUS lab computer that is running Windows XP SP3 OS, click Start → Control panel → System. At the System properties window, click the Remote tab, check the "Allow users to connect remotely to this computer". Then, click the "Select Remote Users..." button and add your userID (nusstu\yourUserID for student or nusstf\yourUserID for staff) to the Remote Desktop users list.
- Ensure that the NUS lab computer firewall is on and exception is allowed for "Remote Desktop" with "TCP 3389" service with "Any" scope configuration.
- (optional) Please download and installed the Remote Desktop Connection 7.0 client update (for pc running Windows XP SP3, Windows Vista SP1 or SP2) for that NUS lab computer that is running Windows XP SP3 OS.
- In your Windows 7 OS notebook at home, open a "Command Prompt" (Under Accessories Programs). At the Command Prompt, type
ping labComputerName
If there is a reply from your labComputerName with IP address of 204.xxx.xxx.xxx, please call your friend in that lab in NUS to use his/her computer in the lab to perform a ping to that labComputerName. If your friend gets a reply from your labComputerName with IP address of 172.xxx.xxx.xxx, note down that IP address of 172.xxx.xxx.xxx.
In your Windows 7 OS notebook at home, run RDC and fill in the "Computer:" as "172.xxx.xxx.xxx". Also fill in your userID (nusstu\yourUserID for student or nusstf\yourUserID for staff) to the "User name:" in RDC and click the "Connect" button.
- In that NUS lab computer that is running Windows XP SP3 OS, click Start → Control panel → System. At the System properties window, click the Remote tab, check the "Allow users to connect remotely to this computer". Then, click the "Select Remote Users..." button and add your userID (nusstu\yourUserID for student or nusstf\yourUserID for staff) to the Remote Desktop users list.
- When using RDC in your Windows XP SP3 x86 OS computer to connect to a remote server that had configured RDC with Network Level Authentication (NLA) setting, you encountered the below error message:
The remote computer requires Network Level Authentication which your computer does not support. For assistant, contact your system administrator or technical support.
This is because your computer is either not running at least RDC version 6.0 or higher version, or the Credential Security Support Provider (CredSSP) is not turn on in your Windows XP SP3 x86 OS.
For pc running Windows XP SP2 x64 OS, the Network Level Authentication in RDC is not enabled by default. Microsoft does not provides any support on how to enable the Network Level Authentication in RDC for Windows XP SP2 x64 OS. Hence, user with Windows XP SP2 x64 OS pc cannot connect to a remote server that had configured RDC with Network Level Authentication (NLA) setting.
If your Windows XP SP3 x86 OS computer is running RDC below version 6.0, it does not support NLA. Please download and installed the Remote Desktop Connection 7.0 client update [for pc running Windows XP Service Pack 3 (SP3), Windows Vista Service Pack 1 (SP1), and Windows Vista Service Pack 2 (SP2)] in order to make use of the new Remote Desktop Services features in it.
CredSSP is a new Security Support Provider (SSP) that is available in Windows XP SP3 x86 OS by using the Security Support Provider Interface (SSPI). CredSSP enables a program to use client-side SSP to delegate user credentials from the client computer to the target server. Please refer to the Microsoft website on how to enable the CredSSP protocol via a registry modification on Windows XP SP3 x86 OS.
After turning on the CredSSP, you need to restart your computer for it to take effect before using RDC, or else you will encounter an error message "An authentication error has occurred (code: 0x507). Remote computer: xxx" when using RDC to connect to the remote computer. - When attempting to establish a Remote Desktop Connection using RD client (mstsc.exe) to a Remote Desktop server which is running Windows Server 2008 R2, you may encounter the below message:
The connection cannot be completed because the remote computer that was reached is not the one you specified. This could be caused by an outdated entry in the DNS cache. Try using the IP address of the computer instead of the name.
To resolve the issue, please login as a local administrator to the Remote Desktop (RD) server. Then, kindly change the remote desktop security on the RD server to RDP Security Layer to allow a secure connection using Remote Desktop Protocol encryption:
1. Navigate to Start > Administrative Tools > Terminal Services > Terminal Services Manager.
2. With RD Session Host Configuration selected view under Connections.
3. Right click RDP Listener (Connection Name: RDP-Tcp) with connection type Microsoft RDP 6.1 and choose Properties.
4. In the "General" tab of the properties dialog box under Security, select RDP Security Layer as the Security Layer. You can leave the "Encryption Level" as "Client Compatible".
5. Click OK.
Note: This setting does not need a restart of the Server or Remote Desktop Service. - Solved cannot copy and paste in the Remote Desktop Session (RDS)
The clipboard implements a "clipboard viewer chain" and is application-controlled. Every applications that is added to this "clipboard viewer chain" is responsible for passing on notification messages to the next viewer in the chain. There are applications that do not pass the messages and causes the copy and paste problem in the RDS.
For example, if you used FEKO application and had finished your FEKO simulations in the Windows Server Enterprise 2008 (x64) SP2 Operating System in the RDS of the remote machine, but encountered the copy and paste problem, the FEKO application might still be using the rdpclip.exe process (consumed about 8.2 GB of memory) and has not passed the notification messages to the next viewer in the "clipboard viewer chain".
Please use the Task Manager to kill the rdpclip.exe process and try the copy and paste again in the RDS of the remote machine. If the copy and paste problem is still not solved, please click "Start" -> "Run". Kindly type rdpclip.exe and click the OK button to restart the rdpclip.exe process to restore the clipboard communication.
Disable beep sound in Remote Desktop Connection
In Windows XP, click Start → Control Panel → System. Click the Hardware tab and then click the "Device Manager" button.
At the "Device Manager" window, kindly click View → Show hidden devices. Under "Non-Plug and Play Drivers", select the "Beep" device, right-click and select "Properties".
At the "General" tab, kindly change the "Device usage" from "Use this device (enable)" to "Do not use this device (disable)". Click the "OK" button and restart the computer when prompt.
Please note you will not hear any beep sound (whenever an application requests it, or when an error occurs that trigger a beep sound) in your computer after you have disable the "Beep" device from your computer.
References:
[1] RDP connection to Remote Desktop server running Windows Server 2008 R2 may fail with message 'The Local Security Authority cannot be contacted'
[2] Remote Desktop Manager (by Devolutions Inc.)
[3] Fixing Copy/Paste for Remote Desktop Sessions


0 comments:
Post a Comment